Tuesday, December 21, 2010

Tips, Tools and Techniques Tuesday!


Merry Christmas everyone!  It's hard to believe that the holidays are here already AND in a little over a week this whole year will be over.  This has been a wonderful year for me professionally and I am very grateful.

This week I am going to show you a fun and easy staining technique with Tim Holtz's Adirondack Color Wash.  It is a great method for making background papers.  


There are a lot of fun uses for the Color Wash inks.  Today I am just going to show you one of those.  You will need a few things to do this process yourself.  Those supplies are:
  1. Tim Holtz's Adirondack Color Wash
  2. Water color paper
  3. Freezer paper or another non porous work surface
  4. Paper Towels
  5. Windex


Tim Holtz's Adriondack Color Wash

Since this technique involves introducing a lot of moisture to paper you are going to want to choose a paper that can stand up to that.  I like to use watercolor paper.  I used these small post card size that I will later stamp on and layer onto the front of a card.

Before I get started, I cover my work surface with freezer paper, which you can find right in the grocery store.  You'll want to make sure that you have the shiny side up as that will be your palette.  It is the perfect palette because when you are done with your first set of color, you can just wipe it right up and start all over.

After you've covered your surface, choose between 2 and 3 colors to create your design.  Spray them right onto the freezer paper.


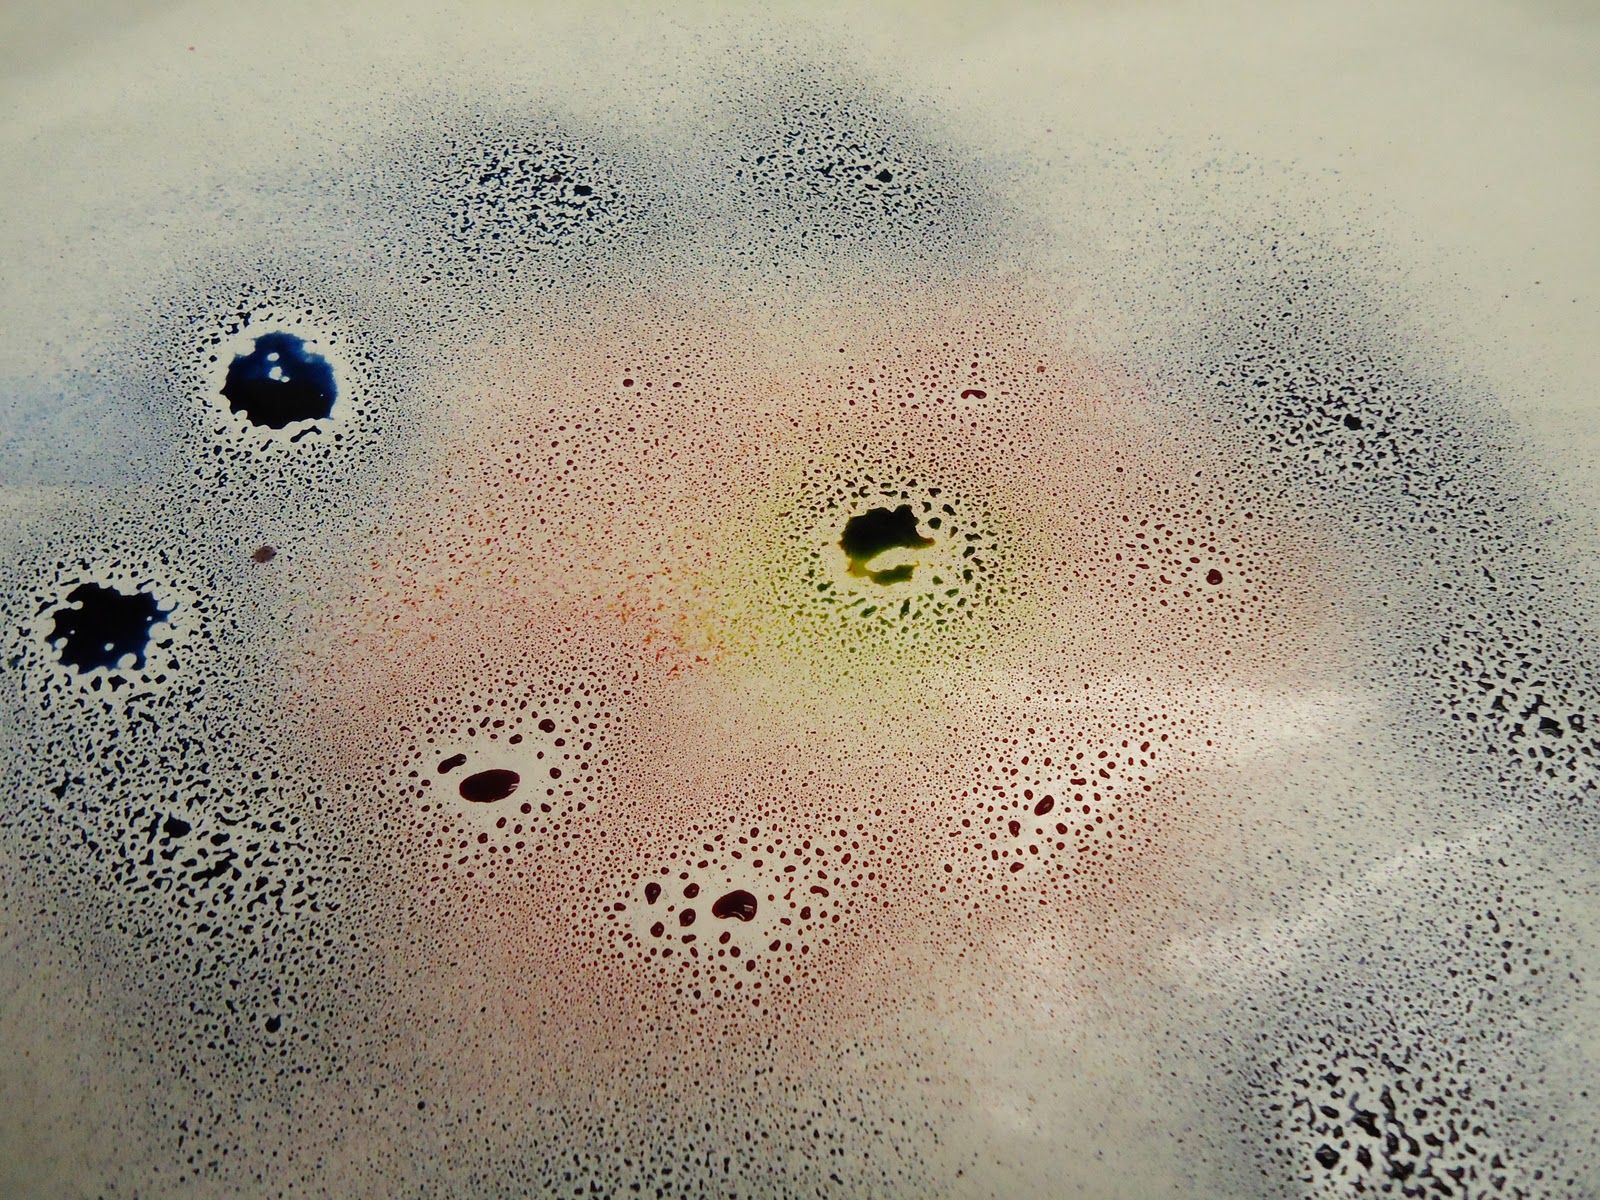
I tried this technique with water and it will work.  However, I discovered that the colors really pop if you spray some Windex onto it.  Then it looks like this...


Then you take your paper and press it down into the mixture.  Tap the paper to make sure that the whole surface gets covered.  Don't worry...the curling that occurs is normal.   It will straighten out some as it dries and then pressing it under some heavy books will take it the rest of the way.


Pull it up and lay it into a clean area of your palette.  It is going to drip, so be careful.


Take some paper towel and blot!  Don't rub, just blot it to get the excess water off.


You can get some really pretty marbling using this technique.  And, come on, messy is fun!

I am going to try to post one more time before the weekend...but if not.  Have a happy and healthy holiday!!

Artfully yours,
Theresa


Friday, December 17, 2010

My Favorites Friday: Snowmen & Penguin Ornaments!!


Happy Holidays everyone!!  Here in the great white north...where we've gotten a touch of snow...I am in full gear for the holidays.  I'm done with my shopping and have even started to wrap!  I'm proud of myself...this is unheard of to be honest.  I'm not too proud to admit that there have been years where I've been wrapping gifts on Christmas Eve!  Not this year.  I'm head of the curve on this one.

Since I'm in the holiday spirit, I wanted to share with you my love of snowmen and penguins.  I have loved snowmen for years and have them all around my house now.  The penguin fetish is quite new actually.  It's all good...there's always room for more.

Every year, I make some kind of ornament to give as gifts to family and friends.  It's become a tradition.  This year, I wanted to make snowmen and penguin ornaments to make everyone's tree happy...mine included!  I am really pressed for time this year because I have so many things going on professionally (that's a post for another time).
I wanted to do something that wasn't too labor intensive...but I still had to give myself enough time so that they could completely dry.

I was thinking to myself today that these are my favorite ornaments.  So, I wanted to share this great project with you early enough so that you can make some too!  There's still plenty of time.

This is what I started with....clear glass balls...


But before you get started, you'll want to grab a couple of other supplies:
  • Black and white acrylic paint (make sure it is fluid acrylic...tube paints won't work unless you mix them with a fluid medium)
  • Deco Paint Pens
  • Pretty Ribbon
That's it!  I promise...


The first thing you want to do is take the hanger out of the top of the ornament.  These pull right out.  If for some reason, one is being stubborn...just give it a twist like you would a soda bottle.  When it loosens, you can then pull it out.  Like this....


Then you want to squeeze some paint inside and start swirling the paint around until the entire inside of the ball is coated.  Then you want to drain them.  To do that, you'll need to put then upside down.  I take the tray that comes with the ornaments and cut a hole in the bottom of each section.  Then I place that over the empty box so that there is  enough space for the paint to drain out.  


I usually leave them upside down over night.  Then the next day I turn them over and leave them for a couple of days to dry out.  It's important that they are completely dry inside otherwise they will leak if they get turned upside down.  That's just icky!


This may sound like a lot of work, but it really isn't.  I like to work on several things at once, so while these dry...I'm working on other projects.

When the inside is dry, I put the hangers back in and started to decorate!


Using white, black and orange Deco paint pens, I began to draw faces on my ornaments.  I started with the penguin faces first because I wanted to make sure that adorable white face was dry before adding black eyes and an orange beak.  The snowmen took a few minutes.  Just be careful not to smudge any wet paint while you are working.

I actually left the penguin ornaments dry overnight before adding the other details.  When I was done, they came out like this...


Aren't they cute?????  I'm going to attach some thin, black organza ribbon to the hangars in a loop to hang them from instead of using metal hooks.  I think it'll make them pretty.

I would love to see what you all are making for the holidays.  Send a picture of your favorite home made ornament and why you love it...I'd like to post a blog of what everyone is doing.

Artfully yours...as always,
Theresa

Thursday, December 16, 2010

SIZZIX TRIPLE PLAY BLOG HOP WEEK 7: MOLLY'S TRAVEL BAG


Welcome to the 7th and, sadly, the LAST installment of Sizzix Triple Play Blog Hop.  Well, at least for now.  This has been a wonderful and fulfilling experience for me personally.  I looked forward to the challenge every week, it stretched me as an artist and I had the great fortune to be linked to many of the talented designers in our industry.  I want to take a minute here to personally thank Sizzix, Eileen Hull, Brenda Pinnick and Karen Burniston for allowing me to be a part of this Hop!  Considering the size of this blog hop...it took a lot of behind the scene prep and also cost!  So, thank you times ten!

Out of this experience is born some other great experiences.  I can't get into all of it right now, but keep checking back.  When it happens you will know!!

Now onto this week's project...

This week's project features Eileen Hull's Treat Bag Toppers die.  Several elements came in my kit.  The die itself features 3 separate toppers, but one in particular stood out to me because it looked like a purse handle.  Then the size of it made me think that'd it be perfect for a doll...which made me think "American Girl"!  So, I chose to make a travel bag for Molly from Americal Girl.

Here is what you need from Sizzix:
Sizzix Scoreboards XL Die #656774 - Treat Bag Toppers
Sizzix Big Shot
Sizzix Accessory - Cutting Pad, Extended 1 Pair 
Sizzix Little Sizzles - 6" x 13" Mat Board Pack, 6 White Sheets

And you will also need:
Fabric of your choice
Batting
Needle and Thread
Steam-a-Seam 2 fusible web
Iron
Scissors
Ranger Adirondack Colorwash, Espresso
Ranger Adirondack Dye Ink Pads, Espresso & Ginger
Stipple Brushes
Mod Podge - Glossy AND Fabric
Foam Brushes
Paper Towel

If you click the link above for the Treat Bag Toppers die, to the left of the picture you will see a link that says "line".  When you click that link, you'll see how all the elements are laid out on the die...which is very cooly btw!  You will see there are 3 toppers and several other elements for embellishing.  Out of all of those, as I was saying earlier, I was inspired by the one that looked like a purse handle...almost kind of like a carpet bag.  I also had some fabric that I liked.


I am not much of a sewer...and I am still just learning how to use my machine....whiiiiiiiich.......I left in the box for this project.  Since the purse is doll size, I figured by time I make a bobbin and thread my machine, I could just hand sew it.  I sewed it inside out and just up the sides.  It looks like a kid did it, but I tried my hardest.  :)


And at least it looks a lot better once you turn it right side out!  Whew!  I then filled the purse with some batting to puff it out so it would look full.  I cheated and used fusible web to seat the top.


The fun part of any art project for me is always the MESS!  Making sure to put the fabric purse part away.  Otherwise I inevitably get it dirty.  I wanted to make the topper look like wood and after playing with a few techniques on the mat board, I decided to go with Adirondack Colorwash in Espresso.  


At the moment, the drafting table in my studio is covered in freezer paper...glossy side up.  It happens to make a nice palette and was convenient for what I did.  The Colorwash comes in a spray bottle, so I just spritzed some onto the freezer paper.  I dampened a foam brush and just picked up the Colorwash from the paper and brushed it onto the mat topper.  I made several passes at this wiping with paper towel after each application until I had a shade I liked.  Here is a closer look at the result:


I let that dry for a couple of hours.  Then I brushed a thick coat of Glossy Mod Podge over the entire element and let it dry thoroughly.  After separating the hearts, I brushed on Ginger dye ink on the outside heart and Espresso dye ink on the inside heart.  I then put them back together and also brushed those with Glossy Mod Podge.

Once the handle was good and dry, I used Fabric Mod Podge to adhere it to the bottom part of the bag.


Next, I glued the heart elements to the front plate of the bag handle.


And now Molly has a new travel bag!


While I'm sad that the Sizzix Triple Play Blog Hop has come to and end...for now...I'm still looking forward to bringing you some really great projects that you can try at home.  It has been my sincere pleasure to showcase some of the fantastic dies that Sizzix has to offer.

Artfully yours,
Theresa

Tuesday, December 14, 2010

Tips, Tools and Techniques Tuesday!


Happy Tuesday to you all!  This weeks post is going to be short and sweet.  It's the holidays and who has the time to read my long banter!?  :)

This week's tip is very simple...it's about scissors!  I don't care if they are your everyday average scissors, pinking shears or rotary cutters...those things are expensive.  As with all crafting supplies, to get the most bang for your buck, you have to take care of them properly.


 If you are like me, you have about a hundred pairs of scissors.  Also, if you are like me, there is nothing more frustrating than a dull pair of scissors!  I remember when I was a little girl, there was a man that came around in a truck (just like the ice cream man!) and would sharpen scissors and knives for the locals.  Sadly, that doesn't exist anymore.  :(  I can't say I'm surprised in this day and age...I mean, who wants people coming out them with sharp objects!!

A few years back I received this piece of advice.  I'd like to pass it on to you.  It won't sharpen your tools, but it will help you get the most life out of them.  The advice is simple....DESIGNATE YOUR SCISSORS!  Simply put, scissors for paper should be used for paper only, metal for metal...fabric for fabric, etc.!  Don't interchange them.  Paper dulls scissors and if you try to use those scissors on fabric after a while, you'll find that they just don't cut crisply anymore.  OH...before I forget....please, please...if you designate only one pair of scissors, make sure you designate one pair for cutting things that are sticky like foam tape.  It doesn't matter how much Goo Gone I use on a pair of scissors that I was cutting sticky stuff with, they are just never the same.

I just want to remind everyone that this Thursday is going to be the LAST week of Sizzix Triple Play Blog Hop.  It just went so fast.  So, don't miss it this week.  It will be a very special day.

Artfully yours,
Theresa


Friday, December 10, 2010

My Favorites Friday: Beeswax


Happy Friday everyone!  Today we're going to just get right into it.  Beeswax!  It is truly one of my favorite things.  I really like everything about it...it's warm, it's messy, it makes my studio smell fantastic and it's flexible!!  What do I mean by flexible?  Ah, that is just the beauty of beeswax.  We'll get to that in a minute.


Let's start with the wax itself.  Believe it or not, beeswax comes in two varieties...the natural kind and synthetic.  Synthetic beeswax isn't really beeswax even though you will find it listed that way.  It is a human made substance.  Probably the coolest thing about it, is that it comes in colors.  However, there are drawbacks to synthetic waxes. First of all, they are not as pliable as natural beeswax.  Secondly, there has been an ongoing debate as to how safe they are to use.  When the word "toxic" gets thrown around, I tend to steer clear.  Personally, I prefer natural beeswax and I stay away from synthetics.

You can find natural beeswax in a variety of states...like in a jar and the wax is in small little chips.  That's cute and all...and part of what you'll be paying for is the nice packaging...which you can always save and alter later!  I just run over to my local art supply or craft store (of course, you can buy online!) and I buy a gigantic hunk of it that comes in a plastic baggie.

Don't drive yourself nuts by trying to cut a small piece of beeswax!  You'll only strain your muscles and get frustrated.  The easiest thing to do is keep that block of wax in it's bag and chuck it in the freezer for about a half hour to an hour.  Here comes the fun part.....when you take it out, whack that puppy with a hammer and the wax will break apart easily.  Then you'll have smaller chunks.

Melting wax....there are several little melting pots out there.  They work wonderfully and are really great to have if you use them for other things besides wax.  Usually the trays that come with those are removable and you would, again, stick the tray in the freezer and the old wax will pop out once it's frozen.  The drawback of using those with beeswax is that they don't hold much wax.  I tend to work on large canvases when I'm using wax and I don't want to constantly have to add wax that I then have to wait to melt.  I use a small crock pot that I leave the wax in at all times.  It has a lid so my wax doesn't get dusty.  When I want to work with it, I simply take it out, plug it in and turn it on.  Then I gather the rest of my supplies while the wax melts.

IMPORTANT NOTE:  Once you use a household item (like a crock pot or a toaster oven) for craft or art materials (like clay or wax) you NEVER EVER want to use that appliance again for food!  

Getting back to what makes beeswax so flexible...in my collages, the beeswax acts as the adhesive.  This means that if I have placed an element somewhere and I change my mind about it's placement, I can simply reheat that area and lift the element out.

There are a few tools you'll need besides a vehicle to melt your wax.:

  • some kind of brush that you will dedicate to wax only.  I use that same brush each time I work with wax.  Once you put it in the hot wax, the bristles will loosen right up.  If you go the crock pot route for your wax, I suggest a long handled brush.
  • a heat tool!  wax sets quickly, so you'll want to have that tool handy.  it's also helpful for heating areas that you want to remove an element from, creating drips with crayons or blowing those crayon drips to make neat textural elements
  • a mini iron.  you'll need this to smooth areas out.  "But I don't wanna!", you may say....that's totally cool to leave a rustic, rough surface.  However, if you are going to put any photo images you'll want a smooth surface underneath it.
This is the basics of wax.  I really like using it so much better than glues sometimes, just because I have the ability to change things up if I don't like something.  There are several techniques for working with wax AND it will really hold just about anything.

Below are a couple of beeswax collages.  I hope you enjoy them.  Let me know if you give beeswax a try.  I would love to hear about it and see what you've made!


This collage incorporates dress pattern, a photo (which is printed
on copy paper), buttons and ribbon.  It also has crayon drips 
and smudges.


This collage incorporates an image transfer right onto
the wax.  It is super simple!

Artfully yours....
Theresa

Thursday, December 9, 2010

SIZZIX TRIPLE PLAY BLOG HOP WEEK 6: VERTICAL WALL HANGING


Here we are again! It's Week 6 of the Sizzix Triple Play Blog Hop!! I am sure you all share in my amazement that 6 weeks has flittered by so quickly. This week features a pretty spectacular die by Brenda Pinnick. Brenda, ever so generous sent over a whole mess of pieces for this project cut from paper, HER fabric, felt and this really awesome material that is really similar to burlap but with a cooler texture. I LOVE TEXTURE! I chose to stick with the material and save the paper til later. Here's what I got in my goody bag...

What was really interesting was that if you go to the Sizzix site you will see that this is intended to be an album. However, since Brenda send the positives and negatives for this die and there was so much of it, I decided to do some layering and make a cool wall hanging for my studio.

The products you will need from Sizzix to use Brenda's die are:
Paper, Mat Board or Fabric of your choosing

I have to share something right now. I think if there was going to be a secondary title for this Blog Post it would be....Confessions of a Sizzaholic! Yes, folks, I am officially hooked on these products and I've gone and bought the farm!

In creating this project, I chose to incorporate some other Sizzix dies to create the wall hanging. Now I know there are just some squares, but it was so much easier to cut them with the Sizzix dies...and, of course, the gigantic Westminster Edition of the Big Shot Pro. This is one sick machine, I tell ya! Isn't it a beauty?!?

Here are the other supplies used in this project:

Fabric
Pellon 911FF - Featherweight Fusible Web (1 sided)
Steam-a-Seam 2 - 1/2" two sided fusible web
Cord
Assorted Ribbon
Assorted Bazzill paper in coordinating colors
Low Temperature Glue Gun
Glue
Glitter
Japanese Screw Punch

Before I ran my fabric through the Big Shot Pro, I ironed on the Pellon fusible web. It is a pretty good stabilizer and makes it easier to cut the fabric. These machines are so great, I was able to run multiple layers of fabric and paper through them. What a time saver!

Once the stabilizer was attached, I ran the fabric through the machine and made my squares. Like this:

Next, I layered my fabric squares along with the pieces from Brenda's kit. I wanted each square to be different and just played until I found something that I liked. Like this:

Once I had 5 squared laid out the way I wanted them. I used the Steam-a-seam 2 between the layers and ironed them together so that they were adhered together.

Next, I laid the assembled squares out in an order that I liked.


One hole is already punched for you with this die, but I needed some extra holes to run my cord through. I punched an extra hole at the top and another at the bottom with my Japanese Screw Punch.

I ran my cord through, running it so that is mostly ran across the back of the square. I am not much for measuring (is that bad?). I am more of an "eye-baller", which is what I did to space these out appropriately.

I tied some little bows and with my hot glue gun, I glued them so that they sat just at the top of the square just covering the bottom hole. This served a couple of purposes. First, it kind of hid the hole. Second, because the glue covered part of the cord, it helped keep the square in place. For good measure, I flipped the squares over and ran a line of hot glue under the cording in the back as well.

I tied a knot in both ends of the cord so that it wouldn't unravel and a simple loop in the top. While I loved the color scheme and the texture of the fabrics, it needed a little something more, so I took some card stock in shades that complimented the colors I was already using and began to cut some flowers with my Big Shot. I cut so many flowers, I'm set for spring!

I then took half my stash and glued and glittered them up just because...honestly...who couldn't use a little sparkle? I assembled the flowers with double stick adhesive, but I glued the bottom layer to the fabric squares with hot glue.

Here are close ups of the squares. I really hope you enjoy!


That's it for this week. It's almost sad...because this means that there is only ONE week left to this blog hop. I am really grateful for this opportunity. It's been a blast!

Gotta hop.....

Theresa

Wednesday, December 8, 2010

Tips, Tools and Techniques Tuesday!


Today, I am going to introduce to you another really great product! It is called a blender pen. A blender pen is a special pen that is filled with a clear blending solution. There are several brands out there, but my personal favorite is the Dove Blender. There is just something about the blending solution in this particular pen that I prefer.


If you go right to the Dove Blender site, you will see that you can not only get the pens, but replacement nibs as well as extra solution. As with any tool, in order to get the most success out of it, you need to make sure that you take proper care. If you just want to give it a try, you can get a starter kit with comes with a pen, a small bottle of blending fluid as well as 3 new nibs. Believe me, you'll love this product. Would I steer you wrong??


Since you now know where to get one, it's probably a good idea that I give you some of the whys and hows. Here is a list of reasons why I personally enjoy using a blender pen:

  1. Blender pens allow me to use products that I already have in new and unique ways...such as watercolor pencils, water based ink pads and markers
  2. I am able to achieve a watercolor look (as you can see in the image above) without using water. (What's the big deal about water?? Well, for one, depending on how much is introduced to the paper you are using it can cause it to curl or peel. Then there are papers that don't lend themselves to traditional watercolor at all, such as gloss coated cardstock.)
  3. Blender pens work on several surfaces and it takes the guess work out of paper type. They work on cardnstock, watercolor paper, copy paper, vellum, wood...and more!
  4. I have more control when it comes to using dark color markers.
Those are just a few of the reasons! Another cool thing about a blender pen is that you really only need one pen! When you are finished with a color, just make little x marks or roll the tip across a scrap piece of paper and the original color will come right out. Keep in mind that certain pigments (such as purples and reds) will stain the tip but the fluid will still come out clear. Then, when that tip gets all icky and gross, pull it out and toss in a new one.

Now here are some ways that I use my blender pen:
  • Watercolor pencils: starting with your lightest color working to your darkest , color in your image without going all the way to the edges. use the blender pen to blend the colors together and move the color out to the edges
  • Watercolor pencils: as shown below, use the pencil to trace over all the detail lines, then pull the color out to the rest of the image

With the following techniques, you want to pay close attention to how dark or light you want your color to be. You can always make the color darker, but you cannot take the color away once it's there.
  • Water based stamp pads: lightly brush the tip of the blender pen onto the pad and then color your image by starting where you want the color to be more concentrated...then work from that point out every time you add color to your pen. As you pull the color out from your starting point, it will get lighter.
  • Water based markers: use the same technique as above, except touch pen tip to pen tip. You can also use a palette if you want. I either use the information side of an old CD (believe it or not, I have a bunch of the old AOL CDs that they used to send in the mail!) or a glossy ceramic tile. Just draw onto the palette with your marker and pick the color up on your blender pen from there. When you're done, you can just wipe the palette clean with a damp paper towel and save for reuse!


Do you use blender pens? I am sure everyone would like to know how you use yours! I'd love to hear your comments about blender pen techniques!

Don't forget...Thursday is week 6 of the Sizzix Triple Play Blog Hop. Check back in...I wouldn't want you to miss it!

Artfully yours,
Theresa


Related Posts Plugin for WordPress, Blogger...